|

Vydáno dne 15. 02. 2019 (6868 přečtení) |
|||||||||||||||||||||||||||||||||||||||||||||||||||||||||||||||||||||||||||||||||||||||||||||||||||||||||||||||||||||||||
|
přepnout na verzi v češtině
Added on March 3rd 2019 (Curtis-A, Curtis-B) (at the beginning) |
To tell you the truth, I'm not very familiar with those various modes of squeeze keying. For a long time I only used a manual telegraph key and I somehow learnt to use paddles in later adulthood. My way of sending is more like a one-lever style, but I feel more comfortable with the two paddles key. If the key has the ability to switch several "modes", I always choose the one where I can tap a dot when the dash lasts (and the following space) and it is send after the dash is finished. I have such a pleasant feeling that I can play some characters (like C or Y) in advance. This is also the way the key, described here, behaves.
Added on March 3rd 2019 (Curtis-A, Curtis-B)
So finally I learned something about the two modes of Iambic squeeze keying. I have found that what I prefer is the so-called Curtis-B mode, or else complementary keying. The key described in this article is set by default (once the code is loaded into a MCU memory) to this Curtis-B mode.Then I decided to add the Curtis-A mode, or else real keying. (I also corrected one little bug there in the code - the reversing of dot and dash paddles did not work correctly). I saved the new code in the DOWNLOAD section.
Switching between Curtis-A and Curtis-B is via the button on the PROGRAMM Pin3. (normally it runs random text). By holding it on when the power is on, the mode changes and the key informs us by playing MA or MB. The setting is stored in the Eeprom memory.
At first, I tried a simplest version of the key on an older PCB with a soldered Atmega328 left over from some previous project. Never before I was thinking over the way of programming the squeeze keying so I was a bit afraid of it. Now, when I thought about it sor a while, I found out that it is not a rocket science. The very first version had only output to the keying transistor (no self-generated side tone) and one button to adjust the speed. I was happy with how nicely it worked, and so I started adding more features. When one of my colleagues from the radio club mentioned that he was going to teach telegraphy his grandchildren (and I hope that himself too), I decided to design it with the PCB, to help him.
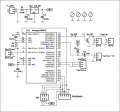
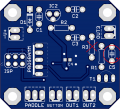
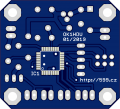
| Schematics | Design of the PCB side A | Design of the PCB side B |
I designed the circuit board originally only with one button, the speed-change. While holding the button, the dot-paddle increases and the dash-paddle decreases the speed. Then I realized I could connect more buttons to the pins of the programming connector. This increased the number of buttons to a total of four and the control options almost to infinite. And so I started to invent and add more features.
So I gradually added:
- reset the speed to the default value
- tone generation on one output pin (sidetone)
- set the pitch of the sidetone (also reset the pitch to the default value)
- swapping paddles of dots and dashes
- possibility to save text (CQ) into Eeprom memory
- generation of five-characters groups of random text (only letters or mixed text)
- switching Curtis-A and Curtis-B mode
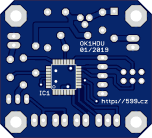
The electronics of the key is on the PCB of size 38x43mm. In addition to MCU, there are just 5 volts regulator, blocking capacitors, output keying transistor and connectors. I used the Atmega328PB MCU in smd version (TQFP) (complete description). At first, just because I have a couple of them. (I bought 10 pieces on ebay.com recently). I know it's a little bit oversized for this use. Most of its pins (ports) remain unconnected, and even if I've added additional features, the 32kB flash memory is only used for a few percent. I have designed the PCB for the Atmega328(P), so the PE0 and PE1 ports are connected to the power supply (VCC, GND). However, they are not used at all, so in default they are configured as high-impedance input ports, so it does not matter. However, you can not use the older version of Atmega328(P) (without B at the end). I will explain below. The reference voltage filtering components R2 and C3 are also on the plate. However, no AD converter input is used, so these components don't need to be installed. I have soldered them in order to fill free soldering holes. ;-) The smd blocking capacitor C4 probably does not need to be installed. I have sometimes mania to block the supply voltage more than necessary ;-) Do not install the resistor R3! It was a mistake! The sidetone output is directly from one MCU pin only via a coupling capacitor. To avoid too high output current, a load resistance of at least 220Ω should be applied, if we use the 5V supply. For testing, I used a 75Ω speaker with 220Ω in series. The volume is pretty decent. The MCU has 1kB Eeprom. At first I planned to store the text in memory in compressed form, but then I found that for the (even very long) CQ the 1kB is more than enough. And I think the feature of sending more than one CQ-text out of memory is not necessary.
Compiled codes (both .hex and .bin) for the MCU Atmega328PB are available in the DOWNLOAD section of this site. The MCU uses an internal 8MHz RC oscillator. By default, the frequency is devided by 8. You need to cancel this in configuration bit settings, when programming. It is also good to use the reset when the voltage drops below 2.7V (brown-out), because at lower voltages the 8MHz functionality is not guaranteed.
| Example of setting configuration bits (fuses) | ||
Current consumption from the power supply
If you do not press any button or paddle for about 2 seconds, the processor will go to "sleep mode". If we feed it directly, for example from a 4.5 V battery, it would consume about 15 µA in this "sleeping" state. But the 5V regulator itself consumes current of about 2.6 mA (according to the datasheet it can consume up to 6 mA, but it will probably depend on the particular manufacturer). So, if we want to have the minimum current consumption, such as for battery power supply, we either have to use some other voltage regulator or do not use it at all, and power it directly from the battery of about 3 to 5 V. The processor reset (brown-out) is set to 2.7V, so at the supply voltage lower than about 3.5V we would have to replace even the protective diode with a wire jumper.
Problem with generating of randomness
When I added the last feature - generating five-character groups of random text, I had quite a problem with generating really random numbers in a certain range. I have tried several different practices described in the discussions on the Internet. The only thing that really works for me is to keep running a 16-bit counter permanently and always save its immediate state in a variable that participates in the creation of the random number just before the random number is generated . I had to use the Timer3 counter. But this is only included in the newer version of Atmega328PB. In the original version - the Atmega328(P) there are only counters Timer0, Timer1 and Timer2. I have used these three original ones for some timings or tone generation, and if I tried to use them temporarily to generate "randomness" it always ended up in a repeating loop of several characters. Therefore, we need to use the newer version, Atmega328PB.
| Assembled PCB | ... | ... |
Control description:
Up to 4 buttons can be connected to the key. Their functions are activated by connecting the appropriate input pin to the ground (minus power).
Description of button functions
- When holding both the paddles while power-up, the paddles of the dots and dashes swap. The key plays "R" to confirm it.
- Button - Rychlost: Speed setting
- While holding this button the dot paddle increases and the dash paddle decreases the speed. The step is 2 WPM, and after each change it plays 3 dots (S). The set value is stored in the Eeprom memory.
- When holding down when power-up (battery connection), the speed is reset to the default value (about 20 WPM PARIS). The key plays "R" to confirm it.
- When in mode of recording message, brief press inserts a space between the words.- Pin_1 of the PROGRAMM connector: Tone pitch
- While holding this button the dash paddle increases and the dot paddle decreases tone pitch. After each change it plays three dots (S).
- When holding down while power-up (battery connection) - the tone pitch is reset to default. The key plays "R" to confirm it.
- When in mode of recording the message, brief press saves the recorded text and stops the recording. The key plays "=" (-...-) to confirm it.- Pin_2 of the PROGRAMM connector: Memory
- Short press plays the content of the memory (CQ) if it is not empty. Playback can be stopped at any time by pressing any paddle.
- Long press (Hold it until it plays "=" (-...-)). Then it waits for the message to be recorded. When playing the spaces between characters, they are inserted automatically, the spaces between words must be entered manually by the BUTTON-Rychlost (see above). The message is saved by the button on Pin_1 (see previous paragraph). By saving new message, the old message is overwritten. Turning off the power (battery) during recording does not save the message and keeps the old one.- Pin_3 of the PROGRAMM connector: Random text
- Press briefly to start playing five-character groups of random text (English alphabet letters only). Playback can be stopped at any time by pressing any paddle. When playing, spaces between characters and between words are extended.
- Long press (Hold it until it plays "=" (-...-)) starts playing the five-character groups of random text of the English alphabet, digits and characters "/" (slash), "?" (question mark) and "=" (is equal). Playback can be stopped at any time by pressing any paddle. When playing, spaces between characters and between words are extended.
- While holding this button when power up (battery connection) it changes mode Curtis-A to B or vice versa. The key plays MA or MB to confirm it.
Procedure of uploading message to memory:
- Hold the button on Pin_2 of the PROGRAMM connector until it plays "=" (-...-)
- Use paddles to start recording text. There may be longer spaces between the characters, they will be saved as one space with correct length.
- Enter the space between words by pressing briefly the Button-Rychlost. Enter a longer space by pressing it again.
- Press shortly the button on the Pin_1 PROGRAMM connector to save the recorded text to memory. It will play "=" (-...-) to confirm the save.
- If the power turns off before pressing button Pin_1, nothing is saved :-)
I could do inventing more features to infinity. But I was told to stop and publish this version on my web.
So I did it.But I still think I will add/change something soon or later.
Beacon mode. Added 9.6.2021
Since I published this article, I have received several e-mails from hams saying that it would be good if the key could be switched to "beacon mode". As I understand it, that is a mode, when the key keeps sending out some stored text.So I did some little changes in the firmware code.
In the new version 1.4 (its file name contains the word beacon) it works almost exactly the same way as the original one. Only if we hold down the buttons on pins 2 and 3 of the Program connector (Memory and Random Text buttons, pins PB3 and PB4 of the MCU) at the same time when turning on the power, the key sends the character = (equals) followed by the text stored in memory. Then it repeats the stored text still round and round. We can terminate it only by turning off the power.
If we want the key to always start in this mode, even after a power failure, it is necessary to connect these two pins permanently to the ground (minus the power supply). It would probably be ideal to connect a two-pole switch in parallel to the appropriate buttons.
Of course, we need to save the necessary text and set the sending speed (WPM) before turning the key in the beacon mode.
Jarda, ok1hdu
Zase jeden elektronický telegrafní klíč (12.02.2019)
Pastička za dvacku (13.12.2013)
Další elektronický klíč (PicoKeyer-Plus) (01.03.2012)
TinyBug s příposlechem (08.08.2011)
| Novinky |
|
07.07.2023: Update na webu DXFC Dneska jsem updatoval info na webu DXFC.
05.07.2019: Update fotoalba Do fotoalba jsem přidal pár fotografií ze:
Slovinska (červen 2019) Fotoalbum prozatím zrušeno. 05.12.2018: Update fotoalba Do fotoalba jsem přidal pár fotografií ze:
Slovinska (jaro 2018) a ze: Suchého Vrchu (zima 2005/2006). Fotogalerie je prozatím zrušena. |
| kalendář |
| |||||||||||||||||||||||||||||||||||||||||||||||||
| Radary ČHMU |
|
|
| Zaparkováno na: |

|
| TSL certifikát: |

|
Tento web site byl vytvořen prostřednictvím phpRS - redakčního systému napsaného v PHP jazyce.
Na této stránce použité názvy programových produktů, firem apod. mohou být ochrannými známkami
nebo registrovanými ochrannými známkami příslušných vlastníků.


